Hi there girls!
With the party season almost upon us, I thought I'd share with you all a quick, easy way to achieve a gorgeous, glamorous up-do without the need for a trip to the salon!
A few weeks ago I was asked by my best friend if I would create this look in her hair for her Mum's Wedding.. It worked beautifully and really is so simple and effective!
A few weeks ago I was asked by my best friend if I would create this look in her hair for her Mum's Wedding.. It worked beautifully and really is so simple and effective!
Step One: Start by spray heat defence product all over your hair, this will protect it from the heat which you'll need to use
Step Two: Once the heat defence spray has dried in, section off your hair and begin to curl small sections. I used a GHD styling iron. You can use anything you wish to create the curls; Other straighteners, Curling wand, Hot rollers etc - Bare in mind you're going to be pinning the curls later on, so they don't need to be perfect!
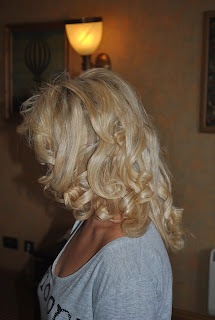
This was Sarah's hair once I'd finished roughly curling it all, sprayed over with some secure fix hairspray!
Step Two: Once the heat defence spray has dried in, section off your hair and begin to curl small sections. I used a GHD styling iron. You can use anything you wish to create the curls; Other straighteners, Curling wand, Hot rollers etc - Bare in mind you're going to be pinning the curls later on, so they don't need to be perfect!
This was Sarah's hair once I'd finished roughly curling it all, sprayed over with some secure fix hairspray!
Step Three: Once all over your head is curled, start to take small sections on the crown of your head and back comb gently to create a touch of volume - Spray lightly with hairspray to hold the volume in

(Hi there! hehe...)
Step Four: Once you've created as much volume as you personally like, you then need to make the decision as to where you want to position your hair; whether that be to the left, right or simply raised at the top of your crown. Sarah wanted her hair to sit fairly low, on her left hand side. To achieve this, simply take a hair band/bobble the same colour as your own hair and tie a pony tail of all of the curls securely in place.
Step Four: Once you've created as much volume as you personally like, you then need to make the decision as to where you want to position your hair; whether that be to the left, right or simply raised at the top of your crown. Sarah wanted her hair to sit fairly low, on her left hand side. To achieve this, simply take a hair band/bobble the same colour as your own hair and tie a pony tail of all of the curls securely in place.


Step Five: Once your pony tail is positioned where you want the hair to be pinned, start by taking small sections of the curls and looping them out over one another, using kirby grips to secure the hair and keep in place. Repeat this until all of the hair is looped and pinned.


Et Voilà!
This is what the finished look should be like! :)
This is what the finished look should be like! :)
As you can see it's such a simple, pretty way to wear your hair over the coming weeks to any events, or Christmas parties you may have..
I later fixed my hair the exact same way for the evening party of the Wedding, but at the top of my crown..

I hope you liked this simple little tutorial, let me know if you want to see similar in the future..
Hope you're all well!
Xx
Hope you're all well!
Xx
The finished result looks so pretty! I'm definitely going to try it! Thanks for posting :)
ReplyDeleteYou look gorgeous, btw!
This looks lovely and your dress is stunning! Where is it from?
ReplyDeleteSarah xx
Great post! Your hair looks amazing, and you made it look so easy to do. I may have to give this a go :)
ReplyDeleteNicky
,xo
You did an amazing job with her hair, she looks gorgeous. I love your dress too.
ReplyDeleteIt looks gorgeous, love your dress too where is it from?
ReplyDeleteThanks for all of the lovely feedback ladies.. Let me know if you give this a go!
ReplyDelete- My dress is from River Island :)
xx
wow you look gorgeous, so does your friend!! xx
ReplyDeleteI should so know how to do this but I never did so I'm super chuffed now as both styles look lovely but also simple to do!! Yay for Xmas hair!
ReplyDeleteYou both look lovely! You're so tanned! x
ReplyDeleteglad your back :) you look gorgeous in the last pic!
ReplyDeleteThat looks stunning! So chic and simple yet so effective xx :o)
ReplyDelete